600 x 600
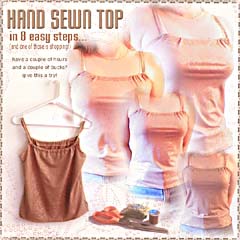
GATHERED-NECK TANK TOP
April 2002 ~ The following instructions will show you how to transform a bit of stetchy fabric
into a top similar to the one shown at the left. No sewing machine is required, just needle and thread. This is simple enough to be a good TV-watching project (not Buffy, though, of course! Sacrilege to even *think* about multi-tasking during Buffy!) SEE ALSO: Basic Tank Instructions
Click on the images for close-up illustrations.
Please send photos to vryadvav@netscape.net of how your version turns out, I'd love to see!
READ ALL THE INSTRUCTIONS BEFORE STARTING!
600 x 600
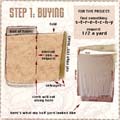
STEP 1: BUYING
"Slayer training?" "Slayer shopping, actually, but equally as important."Unless you just happen to be living with a compulsive fabric-a-holic, chances are you're going to need to go shopping. If there's one around, your best bet is probably Jo-Ann Fabrics. If you don't have one of those, try wal-mart or check the yellow pages for local area fabric stores.
I selected a plain fabric with a few sparkly metallic dots arranged in a vaguely flower like pattern. Plain fabric shows your stitches very well (which is what I wanted for the photos) but for a beginner I would recommend something with a large bold pattern (like this other top I made with the same pattern), or a tiny busy pattern to disguise any uneven stitches you might happen to make. Avoid stripes, they're tricky. Ribbed material is okay, though.
For this project, you want to find something pretty stretchy. Something with a high lycra content would work well. It can be thick or thin, opaque or see-through, fancy or plain, just make sure it's elastic (at least as much stretch as a baby tee, preferably a little more). Bathing suit material, "special occasion" stuff like stretch velour or plain old interlock/knit should all work.
Jo-Ann's always has a bargain section of fabric for $1-2/yard. Most of it's as ugly as ugly gets. But with a little luck, you can find something half decent in a color you only semi-hate. And if this is your first sewing experience, you'll probably be more confident cutting into cheap fabric you're ambivalent about than pricey fabric you absolutely adore. But if you want something nice, you should be able to find something decent for $4-8/yd. Mine was $4.50 a yard (so yes, since I bought 1/2 a yard, I paid $2.25 for the top shown above. It'd be a lucky mall scavenger hunt that'd dredge up a deal like that...)
When you've found just the right fabric, grab the bolt, bring it up to the cutting counter and tell the clerk the amount you need. She will cut that, then print a ticket for you. Take your cut fabric over to the notions section and find a matching thread (or contrasting if you want the stitches to stand out, like the stitches on jeans). Then bring your thread, your fabric and your ticket to the cash register to pay.
So, how much do you need to buy? Short answer: 1/2 a yard. That's if you're around my height (5'4") and build (medium) and want your top to come out about the same width/height ratio as my example did (see top of this page). If you're a little taller or a little shorter, the bottom hem will probably be at a different spot on you than it is on me, but as long as you're choosing pretty stretchy fabric, you should be able to make something that fits, even if it doesn't fit the same way on you as it does on me.
For the long answer, take a look at this diagram which shows how to measure for a paper pattern. To figure out how much to buy, you need to know the distance (in inches) between point A and point E. Then add 3 inches to that. There are 36 inches in a yard, and most fabric stores are willing to cut in 1/8 yard increments, so round up to the nearest 8th from your measurement. For example, if you came up with "21", you would buy 5/8 yard (22.5 inches). This is assuming that 45 inches of stretchy fabric (the width of the fabric when it's rolled on the bolt) is enough to go all the way around you, with a little left-over to cut the straps. If not, then you'll have to multiply the number you got by 2 so that you can cut the front and the back side by side rather than on top of each other.
600 x 600
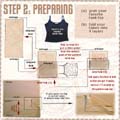
STEP 2: PREPARING
"Remember the three key words for any Slayer: preparation... preparation... preparation..."Before you get started, you'll want to find a tank top you already own to use as a reference point when cutting your fabric. You want one that fits fairly closely, and you especially want to make sure that your fabric is AS stretchy or MORE stretchy than the model tank. Why? Because if you cut your new top the same size as your pattern tank, but the new material is LESS stretchy, the new tank will also be less stetchy, and thus it will be too small.
Now go lay your fabric out on the floor. By folding the fabric over, you'll be able to cut 2 identical pieces, one for the front and one for the back. Because you want those pieces to be horizontally symmetrical you'll want to fold the fabric over once more, so that you get 4 layers. If you don't understand what I'm talking about, try it with a piece of paper first. It's just like cutting those chains of paper-dolls, except that we're only cutting 2 "dolls", and we're going to go one step further and separate those two "dolls" into identical "front" and "back" pieces.
Use the diagram to the left to show you how to fold the fabric. Most fabric stretches more in one direction than it does in another, and it's important that the stretchiest direction should end up going horizontally across your body; the diagram shows you how to fold the fabric so that this is true.
600 x 600
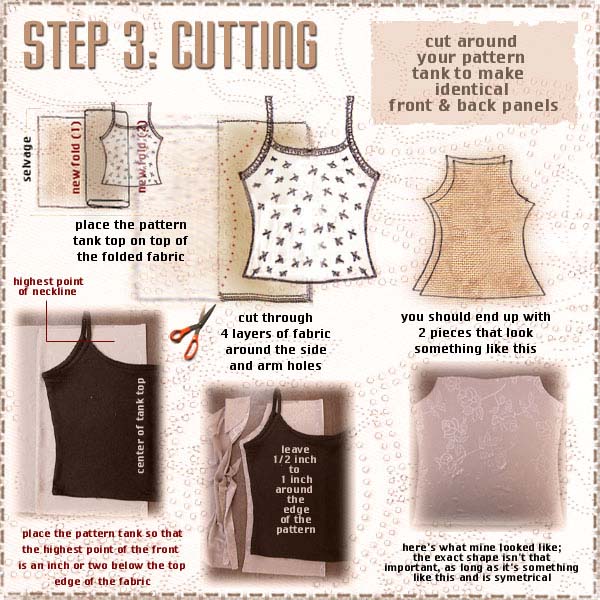
STEP 3: CUTTING
Well, is it too late to join a tribe where they just pierce something or cut something off?Here's the only really irreversible part. Everything else, you can just pull out your stitches and start again, but you could conceivably do something here that would cause you to have to chalk this up as a learning experience and go buy more fabric. No pressure, though ;-) Seriously, if my free-wheeling, oh-let's-just-eye-ball-it method of cutting makes you nervous (just fyi, I hate marking, measuring, etc. I'm lazy enough to just guess and then shrug and go on with my life if I guess wrong) you can spend some time measuring yourself and making a paper pattern to use instead of the model tank top reference-point method.
If you've made yourself a paper pattern, you can use the half-pattern shown in the diagram to make a symmetrical "full front/back" pattern and then in turn use that pattern to cut 2 identical front/back pieces from your fabric, or you can just fold the fabric as shown in the cutting diagram and use the half pattern just as you would the model tank. Cut closely around the side/armhole edge, and around the top and bottom if necessary. Skip to the next step.
For for the brave souls who are ready to cut-and-pray, sans paper pattern, lay your model tank half way over the 4 folded layers of fabric, as shown in the diagram. Note that it's really important that the fabric selvages be over to the outside edge of the tank top, rather than the center. Otherwise, when you cut you'll get 1 full piece and two half pieces that you'll have to sew together, which, while not a tragedy, probably isn't what you want to do. Again, try it with paper first if you need to, and study the diagram carefully. As far as position goes, you want to make sure the exact center of the tank top is on the fold, and that there's a couple of inches of space between the top edge of the fabric and the highest point of the tank-top.
Then just cut around the side edge and the arm-hole edge, leaving around 1/2 an inch of space. Be careful not to actually cut your model! Don't cut the neck or bottom unless the fabric in the different layers is very uneven. If it is, cut in a straight line across the top and the bottom to make all the layers the same shape.
You should end up with 2 identical, symmetrical vaguely tank-top shaped pieces.
600 x 600
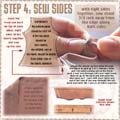
STEP 4: SEW SIDES
"The Slayer's the bloody thorn in my bloody side!"The next thing to do is to join the two pieces, creating the side seams. This is pretty straight forward. First determine what is the "wrong" side and the "right" side of the fabric. The "right" side is the side you want to be on the outside on the finished top. Sometimes it looks a lot different, sometimes only a little, sometimes not at all. So look carefully, and then sandwich your pieces together so that their right sides face each other. You want it to be inside out when you sew the seams, so that when you finally turn it right-side out, the seams will be hidden inside.
You can pin the pieces in place if you want to, or just hold the next bit together as you go along.
Sew along the side edges as shown in the diagram, about 3/8 inch away from the edge.
600 x 600
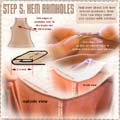
STEP 5: HEM ARMHOLES
"He's- have you seen his arms? Those are good arms to have."Now that the sides have been attached, the next thing to do is to finish the edges of the arm-holes. You do this by folding over the edge to the inside of the top, and then tucking the raw edge under one more time so that it is buried. Then you sew down this little roll of fabric. Start at the top corner of one front arm-hole, and work your way down, past the center seam, all the way to the top corner of the back arm-hole. Then repeat on the other side.
600 x 600
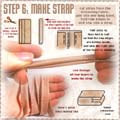
STEP 6: MAKE STRAP
" I just think it's rather odd that a nation that prides itself on its virility should feel compelled to strap on forty pounds of protective gear just in order to play rugby."Hopefully there is some left-over fabric to make the strap with. I made mine with two 18 X 1.5 inch strips (so a total of 36 inches long), but yours might need to be longer or shorter. Start with about a yard of length, though, that should be fine for most people. Cut strips from your material to make the length you need and sew them together into one long strip. If you want really narrow, spaghetti-strap style straps, try making your strips about an inch wide. Otherwise, aim for 1 1/2 to 2 inches.
Fold the strips over as shown in the diagram, so that the raw edges are buried in the middle, and stitch closed.
600 x 600
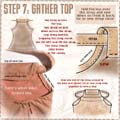
STEP 7: GATHER TOP
"Look at my poor neck... All bare and tender and exposed.. all that blood just ... pumping away.."Now for the part where it actually starts to look like something! What we do in this step is fold over the top edge of the top and anchor it down to create a sleeve that the strap will slide through. You may want to sew the sleeve first and then use a safety pin to thread the strap through. But I prefer to put the strap in first, and then sew the flap down over it, being careful not to actually sew onto the strap. That last part's very important, you want the strap to be able to slide freely back and forth within the casing.
Once you've done the front, pin one end of the strap down so that it can't slither out, and repeat the process using the other end of the strap (see the diagram). Then join the two ends into a circle. You can do this by just tying them together, or you can sew them together. If you're sewing them together, you'll probably want to slide the strap around when you're done so that the sewn connection is buried in the back gather.
At this point, you'll want to go try it on and check the strap fit. You may need to make it shorter or add another piece to extend it. You can bunch the fabric up towards the middle (like Buffy's is in the Inca Mummy Girl screen capture), or you can spread it out so that the neckline's almost flat (like my version) it's up to you. If you want, you can take a few little stitches to anchor the strap to the casing when you've got it arranged how you like.
600 x 600
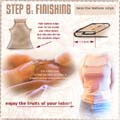
STEP 8: FINISHING
"I wanted to do something I could finish in a weekend, alright? "All right, get ready for that New Clothes Dance, you're almost there! All that's left to do is to hem the bottom edge. This is exactly the same as hemming the armholes, except that you do it around the bottom. Just fold the edge over twice so that the raw edge is buried and stitch it down.
And viola! You are officially done!
Yipes! I messed up, now what?
Take a deep breath and repeat after me: "I meant to do that." Yes, Buffy's favorite defense mechanism, Denial, is the perfect response here. Except that since your life isn't BtVS, you'll probably be able to get away with it without anything blowing up in your face just in times for sweeps... Find your particular catastrophe below, or if it's not listed, e-mail me and I'll see what I can come up with.
It's too narrow!
If it's too narrow because the fabric's stretchiest direction is going vertical rather than horizontal, then as unpleasant as it sounds, you're probably best off unsewing all the seams, turning it 90 degrees and then recutting it as a shorter, but now wide enough, top, this time making sure the stretch goes horizontal. See "too short" below if the result is too short for your taste.
If it's too narrow because you didn't use enough fabric, the best thing to do is to undo the side-seams and sew in another strip of fabric between the two existing edges. You could use more of the same fabric, but that will make it fairly obvious what you're trying to get away with here. So my advice is to go get yourself a little more stretchy fabric, in a different color, and use that instead. Then redo the strap using the new fabric. And if you really want to cover your tracks, get some of that fuseable iron on stuff, iron it on to a bit of the new fabric, cut a shape out of it (a heart, a flower, a snowflake, etc) and iron it on right in the middle of the front. Now you've got a little of the new fabric all over the place, and you should be able to lie quite successfully through your teeth about what your initial plan was.
It's too short!
If it's just a little short, and you happen to like fringe, or lace or any other dangly trim, now's the time to indulge. Measure around the bottom, head back to the fabric store and pick out what you want and attach it.
If the shortage is of a more signigicant nature, and/or you just don't like froo-froo stuff, time to use a variation of the 2nd "too narrow" suggestion: unsew the hem, sew a strip of additional fabric around the bottom, and then hem that. As before, you could go with more of the same material, but that's not in the true spirit of denial. Go buy a little of something different, and attach that to the bottom. Then you can redo the strap with that same new material, so that the new color is featured on the top and the bottom. And again, for real sneakiness, applique some of the new fabric onto the front.
Not enough fabric for the strap! or: My strap is ugly & deformed!
Not a problem, just requires another little shopping trip. You should be able to find some sort of ribbon, lace, elastic cord or other trim to use instead. You could even buy some yarn and make a simple crocheted chain. If the material you select is not stretchy, you'll want to buy enough that you can tie it in a knot on the shoulder (or both shoulders, if you like symmetry) so that you can get the top on and off. If it's stretchy, a yard or so ought to do it.
Variations
Remember I said there was a lot of room for variation with this pattern? Here are some ideas: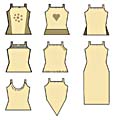
600 x 600
- Do any of the "omigodImesseduprealbad" solutions listed above, but on purpose.
- Make split sides; this is what I like to do on all my tops. When sewing the side seams, don't go all the way to the bottom, leave an inch or two unconnected. Then when you're hemming the bottom, hem up one side and down the other.
- Sew beads or other trim (rick rack for example) along the top to hide the stitches that make the neck-strap casing. And/or sew them in a pattern on the front. If you know how to embroider, or want to give it a try, embellish any of the edges with some of that.
- If you keep extending the bottom long enough (line E from the paper pattern instructions) , you can use this pattern to make a dress (short, knee length or even floor length). If your hips are wider than your chest, you'll want to make sure you cut the fabric that way too! Remember, the distance from line A to E plus 3 inches is how much fabric you need to buy.
- Try a curved neck line instead of a straight one as shown in the rest of these instructions.
- Cut the bottom in a curve or angle.
- Use a different fabric for the front and the back. The back fabric, for example, could be sheer. Or you could use some of the back fabric to embellish the front (applique for example)
- Instead of passing the strap through the back casing, just pass through the front casing and tie it around your neck, halter style. Cut the back down so that it just goes straight across your back at about arm-pit level, and hem.
- When threading the strap through the front & back casings, insert the free end into the furthest side of the opposite casing, so that when you put it on, the straps criss-cross over in the back.
NOTES:
- You can use a sewing machine if you have one available. I'd advise you to hand baste (sew with really big stitches each step, and then use the machine to go back over your stitching. This is a lot more reliable than pinning, especially with stretchy fabric.
- You *can* make this out of non-stretchy fabric if you really want to, but it's going to have to be a lot looser if you expect to be able to get in and out of it. Measure around your shoulders, add a couple of inches, and that's how wide the NARROWEST portion (usually the waist) of your version should be. Or, if you make it form fitting, then you would add a zipper (or buttons) in the back so that you can get in and out.
- You might want to try making the stitches on the front side of the arm and bottom hems smaller than the stitches on back. If you make very small stitches on the front side, they should be barely noticable.
- To be really thorough, you would zig-zag stitch or whipstitch around the side seams to stop the fabric from fraying. With most stretchable fabric that shouldn't be a problem though.