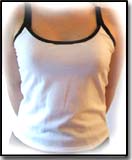
BASIC TANK TOP
 July 2002 ~ my other pattern was getting lonely up here all by itself, so when I happened to catch sight of this cute little tank on an FX rerun of BtVS Bothered, Bewitched & Bewildered, I decided it was time to do an encore. You'll definitely want to read the Gathered Top instructions first, as I'm not going to go into detail in these instructions for issues I've already covered there. And again *please* send me a pic if you make a tank using these instructions, I'd love to see!
You'll want to start by
VIEWING THE VISUAL AID COLLAGE and then read the text notes below for clarification... be forewarned, it's very cutesy. I had a little streak of girly-girl to get out of my system ;-)
Step 1: Paper Pattern
You *can* cut the fabric using a model tank top as a cutting guide as described in the Gathered Top instructions, that's the way I've been doing it for years. But in the interest of some variety, for this set of instructions, I'm going to describe how you would go about creating a paper pattern.
First: get your bust measurement, and take a vertical measurement from collarbone to hips. Divide the bust measurement by 2, and then add a couple of inches for wiggle room; this is how wide a piece of paper you need. The other measurement is how tall your piece of paper needs to be. Find some newspaper or wrapping paper, etc, and cut a square/rectangle of these dimensions.
Once you have a piece of paper ready, fold it in half down the center, so that you can cut symmetrical sides. Now, take a good look at the BBB tank top or whatever other tank top you want to emulate. You want to note how low-cut the neck is, what shape it is, how far the "peaks" of the front are in from the arms, how tight it hangs, how far down it goes, etc. Your goal is to cut the paper to match this. There's lots of different ways to do this of course, but here's how I did it:
 Take a tape measurer or ruler and a picture of the target tank over to a mirror. Hold the ruler up horizontally across your upper chest about where you want the top of the two peaks on either side of the neck to be on *you*. Measure that distance (for me, this was 9 inches). Now, from that horizontal line, figure out how far down the neck-line should scoop (for me this was 2 inches). Now, divide that horizontal distance by 2 (because you're only cutting half the distance, through a fold) and measure/mark that distance from the fold on your paper, along the top edge. Also measure/mark the vertical distance down from the top measuring along the folded edge. Cut a curvy line from one to the other, and open up the paper to see if it looks right. If not, get another piece of paper, try again. The armholes on the BBB tank look to be about the same depth as the decolletage, so for mine, I measured 2 inches down on that side and then just cut a swoop over to the place where I'd already cut the neck-line out. (Sometimes the arms are a little deeper or a little shallower than the neckline, depends on the tank.) Just keep cutting and holding the pattern up to you while looking in a mirror until it looks reasonable. If you're not sure about length, leave it long, and you can always cut it shorter later on.
Now, not sure if this is going to work so well, but I scanned in a copy of mine (in parts of course, because it's too big to fit on the scanner) and used the scan to create a pattern that you may be able to use, if you're medium size/build.
If you cut these 4 out and tape them together, they should give you an idea of what my pattern looked like. You'll probably have to fiddle with your printer settings/margins etc to get it to work...they should come out 100% size at 72 dpi.
Step 2: Get Fabric & Cut
Shopping instructions are pretty much identical to the Gathered Top instructions, so I'm not going to go into detail. Suffice to say, you need enough of stretchy fabric to fit your paper pattern twice, plus extra for the edging. 3/4 yards should be more than enough for most people, you can probably squeeze it in 1/2 a yard if you don't want it too long. If you want to do contrasting neck/arm edging like the one shown here, buy an extra 1/4 yard of a stretch fabric in a contrasting color (or you could use a matching solid color if your main fabric is patterny, or a harmonizing or contrasting pattern. Use your imagination!). Otherwise, you can just use fabric of the same color.
You can double the fabric up, pin the pattern to it and cut two at a time, or you can pin the pattern to a single layer of fabric and cut twice, it's up to you. As long as you get 2 identical pieces, with the stretchiest direction of the fabric going horizontally across the body, then you're good. Out of the remnants (or the contrasting fabric, black in my case) you then want to cut approx 1 1/2 to 2 inch wide strips, enough to edge the neckhole front and back and to edge the armholes and create straps. If you cut four 18 inch strips, that should be just fine. Ideally, you would cut these on the bias (diagonally against the grain of the fabric). If you don't have enough fabric for that, just cut it so that you get maximum lengthwise stetch, should be fine since we're using stretchy fabric to begin with.
Step 3: Sew Sides
Now, with right sides (the side you eventually want to be on the outside) together, sandwich the two main pieces together, and sew along the sides. Turn it inside out and go try it on for your chance to do some fine tuning if necessary. Make sure the neck line looks right (recut if it's not), take it in a bit at the sides if it's too lose, etc.
Step 4: Edge Neck
Take one of your strips and fold it in half longwise, so that it's now 3/4 inch wide. With the tank right side out (seams on the inside) lay the strip folded-edge-down along the neckline, lining up the 2 adjacent raw edges on the strip with the raw edge of the tank. Pin in place, or just hold the first section in place and position the rest as you get to it, and sew. When you're done, flip the folded edge of the strip over the raw edges to the inside of the tank, hiding those edges inside. What you've basically done at this point is to fold the strip in half once more. Anchor to the back using tiny stitches.
Repeat this on the back. Trim any extra that sticks out beyond the neck-line.
Step 5: Add straps/armhole edging
This time, *don't* fold in half, just lay the strip unfolded on the outside of one armhole, starting at one corner (but leaving about an inch trailing off to use later). Sew along the edge (inset photo A). Now flip the free edge of the strip over to the inside, over the raw edges, and then fold the raw edge of the strip over one more time and hide it inside. (inset photo B) Anchor this down with tiny stitches. When you get to the end of the armhole, continue the folding-in-on-itself and sewing (this is the same as the straps on the Gathered Top) on to make a strap out of the trailing end of the strip (inset photo C & D). Once it's long enough, join it to the trailing edge at the other end of the armhole to make a circle. Repeat on the other side.
Step 6: Hem Bottom Edge
Almost wearable! Just hem the bottom by folding it over to encase the raw edge and sewing it down.
Optional Step
Much as I love hand sewing, I have to admit that here we reach a point where a bit of machine stitching really makes a difference in the finished product. So if you have a machine handy, and know how to use it or can get someone to help you, go back over the edgings and straps, one line of stitching on either edge, to flatten them out and give it a bit more finesse. If you're good with a machine, you can use contrasting thread to make the stitches stand out, but in this instance, I chose to use matching thread...
Extras:
 The tank in BBB has a little duck on it and says "HUG ME". I've created a little graphic of my own which you can print to iron-on transfer paper and use if you want... just note that because this is stretchy fabric you have two choices: (A) iron on
directly to the tank, and live with the fact that the stretch is quickly going to pull it apart. (B) iron it on to non-stretchy fabric and applique it to the tank. I'd advise B, though for a small graphic like this one, A is probably not nearly as bad as when I tried to iron on a full-sheet sized graphic (it's just hanging on in unrecognizable shreds now...)
The tank in BBB has a little duck on it and says "HUG ME". I've created a little graphic of my own which you can print to iron-on transfer paper and use if you want... just note that because this is stretchy fabric you have two choices: (A) iron on
directly to the tank, and live with the fact that the stretch is quickly going to pull it apart. (B) iron it on to non-stretchy fabric and applique it to the tank. I'd advise B, though for a small graphic like this one, A is probably not nearly as bad as when I tried to iron on a full-sheet sized graphic (it's just hanging on in unrecognizable shreds now...)
Questions? Comments? Send e-mail or sign the guestbook
Back to sewing project index
Back to Tangled Synthesis
Execution Time1 milliseconds
ParametersURL Parameters:
STATIC=yes
CGI Variables:
SERVER_PORT=80
CONTENT_LENGTH=0
HTTP_ACCEPT=*/*
HTTP_HOST=8wdcq01
REMOTE_ADDR=65.169.47.87
CONTENT_TYPE=
SERVER_PROTOCOL=HTTP/1.1
WEB_SERVER_API=ISAPI
REQUEST_METHOD=GET
CF_TEMPLATE_PATH=C:\MY\buffy\tangled\clothes_basictank.html
PATH_INFO=/my/buffy/tangled/clothes_basictank.html
HTTP_USER_AGENT=Cold Fusion 4.0
AUTH_USER=
REMOTE_HOST=65.169.47.87
AUTH_TYPE=
SERVER_SOFTWARE=Microsoft-IIS/4.0
SERVER_NAME=8wdcq01
QUERY_STRING=static=yes
SCRIPT_NAME=/my/buffy/tangled/clothes_basictank.html
REMOTE_USER=
GATEWAY_INTERFACE=CGI/1.1
HTTP_COOKIE=CFTOKEN=7349956; CFID=3
PATH_TRANSLATED=C:\MY\buffy\tangled\clothes_basictank.html
