Blending/Layering/Masking Tutorial (Demonstration)
So I turned on the TV looking for something to cap for this demonstration, and surprise, surprise, Law & Order was on. So I just started taking random screen shots from the ep to use, with no attempt whatsoever to illustrate the ep, a theme, etc. Just pics to work with.
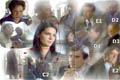 These notes refer to this "inprogress" image, so you'll want to have this open for reference as you read.
To prepare, I created my canvas and pasted in all my screen shots, each on its own layer. I spread them around using the move tool (V) to put them more or less where I wanted them to end up. Then I started in on the blending:
A - lasso & mask
Starting with one of the capture layers activated, I selected the lasso tool (L) and drew a loop around the part of the image I definitely wanted to keep, usually the person's face. Once I had the selection, making sure the layer I was circling on was activated, I clicked the "add layer mask" button on the layers palette. This automatically hides everything in the active layer that *wasn't* selected, so I end up with something that looks like A1 (anita) & A2 (Lennie & Eddie) in the example.
B - blur that mask
Making sure the mask is still activated, I pull up the filter->blur->guassian blur dialog (I use this so often I have it mapped to F5, so that I can keystroke it up) and play with the slider until the original edges of the image (rectangular) just barely start to show. B1 (Eddie standing) & B2 (Abby) in the example; the red arrows point to the edges where they peek through.
C - airbrush finetuning
Then, with a largish soft-edged airbrush (depends on image size, but 35-100 generally) at a light pressure (17%) and foreground color black, I painted on the mask where the rectangular edges still show, erasing them. At this point I'll also brush with black (to erase) and with white (to bring back) to fine tune how much of the original image shows (x on the keyboard to switch back and forth). No need to go into much detail here though, I just stick with that same large light brush, and dab here and there. The whole process shouldn't take more than a minute or two for each image.
I repeated this on each layer, making sure to leave as much of the original backgrounds in as I could without revealing the hard edges; my goal is to completely fill the spaces in between with something, anything. C1 (Lennie & Eddie), C2 (Lennie & Eddie talking to Abby) are examples of this, as are the Ds & Es (see all the blinds from Jack's office over there?). I also tried to leave the very edges semi-translucent so that they could blend with the semi-translucent edges of the neighboring layer to create a smooth transition. If need be, I'd fill in the gaps with additional captures or stock images, but I'm not bothering for this quick demo. At this stage, I also do a lot of moving around (v) and free transform (control-T) to get the various caps to interlock. You want to be sure you like the position of all the elements before moving on to the next step, 'cause it's a bit of a pain (though not impossible) if you want to move something later on.
D - filter
Now for the fun part. With the top-most layer active, I control-A to select the whole collage, then shift-control-C to "copy merge" and control-v to paste a flattened version of the collage so far as a new layer on top of everything else. Then I started applying filters, in this case Brush Strokes -> angled strokes and Noise -> Add Noise. You can use basically any filter or combinations of filters that you want, as long as they don't shift the color too much. I use blur -> motion blur a lot, occassionally one of the distorts or arts. You're looking for something that will gently abstract/texturize all your backgrounds. Don't worry about what it does to the faces (D1-D3). The results of my filter are to the right of that white line (where all the D & E labels are)
E- final mask
Now add a mask to the filtered layer, and using a really large (I used 100) soft-edged brush at light presure (still 17%) airbrush set to paint in black, start brushing the faces back in by painting over them on the mask. I generally dab a bit at the hair and clothes, leaving them partially filtered. When I was done bringing all the faces back in (like E1-E3), I played with the opacity of the filtered layer, finally settling on 73% as good for me. You could also try setting the filter layer to some other sort of mode, "screen" for example. I just left mine at "normal". You could also repeat this step over a few times, with different filters and different degrees of "bring back" the underlying layer's details.
Fishing touches
With that done, the next step would be to play with colors and add any text. Since this is just a demo, I didn't spend too much time here, just control-clicked on the "new layer" icon to get myself an adjustment layer, and used "selective color" to tweak the color cast a bit. I added a white blurred border around the edges, flattened, sharpened and here we are. Not the world's most brilliant collage, I'll admit, but not bad considering how fast I threw it together (it really was about 30 minutes) I think it took longer to do the labeling on the partial version and write this explanation up than to do the collage itself!